I certainly wouldn’t say that I have a green thumb, but over the last few years I have learned a lot about gardening through trial and error. Flowers have always been scary to me, so I like to stick with things that I know I can manage. Good old zinnias and sunflowers, and gladiolas are fool proof and about the only thing I have had success with until… drum roll please… last summer. I was determined to cover my garden fence in climbing flowers, and glory glory…Morning glories were my answer. I was able to grow the most beautiful morning glories, and they cover the entire side of my garden in their simple splendor. Beautiful winding stems, and amazingly vibrant colors all in-twined in my simple garden fence were not so difficult and SO worth the effort!

I love the simplicity of the morning glory. Lots and lots of leafy green foliage that grow and spread quickly with beautifully colored flowers showing up in late summer and early fall. They come in a variety of vibrant colors and the seeds are very inexpensive! They are a great addition to any landscape.

Last spring I did a little research on-line and decided that the morning glory would be the best choice for a climbing flower in or Wisconsin weather. It is an annual which means it grows for one year and then dies off, so I figured it was worth a shot. Upon doing some research on how best to grow them in our area, I got a little nervous. I read that they can sometimes be finicky and difficult, I read to start them indoors, and not to start them indoors. The research led me to believe that I had no shot at covering my garden fence in beautiful flowers. But, I figured what’s the harm in trying, right? If all else fails, and I get nothing, I am only out the $2.00 that I spent on seeds and a little gardening time which I enjoy anyways!

So the kids and I planted some seeds to make seedlings indoors. We tried a trick that I saw on Pinterest via an image from Saidos da Concha to start our Morning glory flowers. I saved up a bunch of toilet paper rolls and we put them upright in a plastic Tupperware container. We then filled the tubes with potting soil and planted our seeds (which we had soaked in plastic bags in wet paper towel overnight first per the package directions). We watered our seeds regularly and left them in a very sunny windowsill indoors for a few weeks. We were left with some great seedlings to plant in the garden.
We then got to work creating a little flowerbed along the fence row to plant them in. I dug up and tilled along both sides of the fence. This would have been a MUCH easier process had I thought to do it BEFORE we put the fence up, but we finished it none the less. I then covered the tilled area with layers of damp newspaper (to avoid buying gardening mesh which I find to not work as well anyway). We then planted our seedlings right in front of the garden fence by clearing a small spot of the newspaper, digging a hole, and placing the entire toilet paper roll into he dirt. Because the roll is biodegradable, it is the perfect little planting pot. I placed plants about every 2 feet and then mulched the area around them, without covering the plant. And then… I panicked! Because of all of the different instructions that I found online I was sure I was doing it all wrong. So I decided to stick a few seeds in the ground next to our seedlings as well, just to ensure that something would come up.
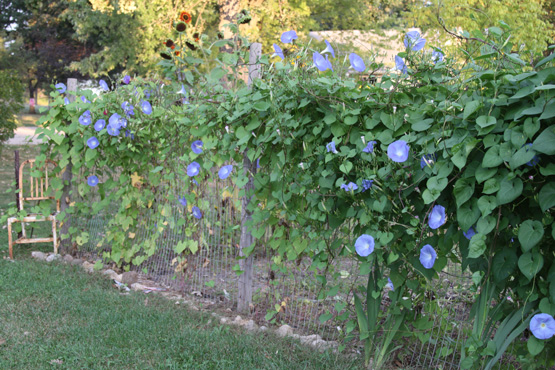
We watered our seedlings and the seeds we planted with them regularly and by late summer we were pleased to have THIS covering our garden fence!

It is beautiful, no?

The seedlings gradually grew, wound themselves all through the fence and all of the posts, and bloomed with these beautiful blue flowers in late summer! The kids loved watching the vines slowly grow up the fence throughout the summer, and they were more than thrilled to discover the pretty blue flowers opening and closing each days as the sun rose. They were a great family project, and we were all very proud that we accomplished such a feet (for us anyways)!

The site of the vines all wrapped around an old rusty metal chair was peer summer time beauty in my book! We even spotted a few hummingbirds who were getting up close and personal with beautiful trumpet shaped blooms.

So, I wish I could tell you exactly what worked, and what didn’t, but I’m just not sure what to attributed to the success of our morning glory covered garden fence. I certainly never dreamed that I would be the type to have a garden covered in such beautiful flowers that I had planter and grown myself. The combination of seedlings and seeds, soil, mulching, and watering combined with the weather last summer lead to a glorious batch of morning glories that I enjoyed so very much!

I guess the moral of this story is that, even if you don’t know everything about gardening, give it a shot. You may get nothing, but you may also be pleasantly surprised, and learn a thing or two as well! Our morning glory seedlings are all planted again this year, and waiting for the threat of frost to disappear in hopes that we can have a repeated successful batch of morning glories covering the fence this summer!
Here are some other fun garden related posts to check out too:
Garden Flowers Make Our Home Feel Happy
Getting Your Kids Involved In The Garden