What do you get when you combine a typically whacky, zany Dr, Suess book with a super cool experiment with the kids? Fun…that’s all there is to it! Upon reading Dr. Suess’ Bartholomew and the Oobleck for the first time with the kids I was inspired to do a project with the kids that I had had on my to do list for a long time. Essentially the DIY version of GAK is the perfect Oobleck type substance! Pairing the awesome GAK making project with the book was a hit with the kids and they were able to act out and play through the story with their very own Oobleck as I read it (over and over I might add)! It was so fun to bring the story to life in a way that gets the kids excited about reading!

If you haven’t read Bartholomew and the Oobleck with your kids yet, you should. It’s silly, fun tongue twisting fun, but in the end it really has a great message too! After the initial reading of this book I thought to myself, wouldn’t it be fun for the kids to make their own Oobleck, and act out the story as we read through it? I remembered seeing a homemade GAK or Silly putty recipe online, that would be the perfect solution. SO, first I found my recipe on Steve Spangler Science where it was labled GAK – Elmer’s Glue Borax Recipe. This site is super cool and dedicated to experiments and cool science activities to do with kids- check it out!
You will need:
Normal
0
false
false
false
MicrosoftInternetExplorer4
8 oz bottle Elmers Glue (Use Clear or white glue for different results)
Borax – powdered soap (found in the grocery store)
Large mixing bowl
Plastic cup
Food coloring – I used neon green
Water
Go to the original recipe on Steve Spangler Science for great step by step instructions and a photo demonstration too!
/* Style Definitions */
table.MsoNormalTable
{mso-style-name:”Table Normal”;
mso-tstyle-rowband-size:0;
mso-tstyle-colband-size:0;
mso-style-noshow:yes;
mso-style-parent:””;
mso-padding-alt:0in 5.4pt 0in 5.4pt;
mso-para-margin:0in;
mso-para-margin-bottom:.0001pt;
mso-pagination:widow-orphan;
font-size:10.0pt;
font-family:”Times New Roman”;
mso-ansi-language:#0400;
mso-fareast-language:#0400;
mso-bidi-language:#0400;}
Experiment
Here’s the easiest way to make a big batch Elmer’s Slime. The measurements do not have to be exact but it’s a good idea to start with the proportions below for the first batch. Just vary the quantities of each ingredient to get a new and interesting batch of goo.
- This recipe is based on using a brand new 8 ounce bottle of Elmer’s Glue. Empty the entire bottle of glue into a mixing bowl. Fill the empty bottle with warm water and shake (okay, put the lid on first and then shake). Pour the glue-water mixture into the mixing bowl and use the spoon to mix well.
- Go ahead… add a drop or two of food coloring.
- Measure 1/2 cup of warm water into the plastic cup and add a teaspoon of Borax powder to the water. Stir the solution – don’t worry if all of the powder dissolves. This Borax solution is the secret linking agent that causes the Elmer’s Glue molecules to turn into slime.
- While stirring the glue in the mixing bowl, slowly add a little of the Borax solution. Immediately you’ll feel the long strands of molecules starting to connect. It’s time to abandon the spoon and use your hands to do the serious mixing. Keep adding the Borax solution to the glue mixture (don’t stop mixing) until you get a perfect batch of Elmer’s slime. You might like your slime more stringy while others like firm slime. Hey, you’re the head slime mixologist – do it your way!
- When you’re finished playing with your Elmer’s slime, seal it up in a zipper-lock bag for safe keeping.
– See more at: http://www.stevespanglerscience.com/lab/experiments/glue-borax-gak#sthash.fAHLcE2B.dpuf
- Elmers Glue (8 oz bottle of Elmers Glue-All)
- Borax (a powdered soap found in the grocery store)
- Large mixing bowl
- Plastic cup (8 oz size works well)
- Spoon
- Measuring cup
- Food coloring (the spice of life)
- Water
- Paper towel (hey, youve got to clean up!)
- Zipper-lock bag (dont you want to keep it when youre done?)
- Water
– See more at: http://www.stevespanglerscience.com/lab/experiments/glue-borax-gak#sthash.fAHLcE2B.dpuf
Materials
- Elmers Glue (8 oz bottle of Elmers Glue-All)
- Borax (a powdered soap found in the grocery store)
- Large mixing bowl
- Plastic cup (8 oz size works well)
- Spoon
- Measuring cup
- Food coloring (the spice of life)
- Water
- Paper towel (hey, youve got to clean up!)
- Zipper-lock bag (dont you want to keep it when youre done?)
- Water
– See more at: http://www.stevespanglerscience.com/lab/experiments/glue-borax-gak#sthash.fAHLcE2B.dpuf

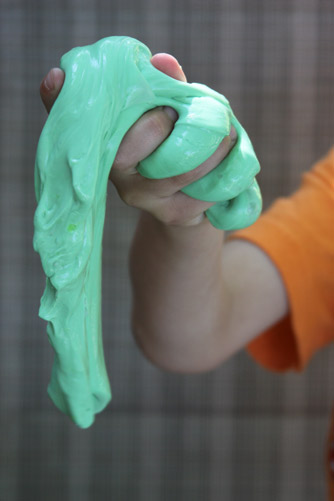
The mixing and combining of the these two ingredients makes a super cool reaction, and this in itself, is a cool activity for the kids. Upon reading through the recipe I realized that if I used white glue I would get more of a light green substance, so I wanted try and get the most ooblecky type substance that I could, so I tried a couple different options. For one batch I used the recipe just like recommended in the original, for the second batch I used clear school glue instead. You can see in the picture above what a difference the type of glue makes.

I loved the look of the clear glue Oobleck and it looked most like the book, but the consistency was definitely different. A little less stretchy and a little more solid than the other batch made with regular Elmer’s glue. Both batches were colored with the same neon green gel food coloring. Either way, the kids loved playing with both kinds of Oobleck, and it was fun for them to have substances with different consistencies to play with.

Upon finishing the task of making our Oobleck we headed outside to have some imaginative play time.

The kids stretched, flipped, squished, patted, played and giggled as the got to know their batches of Oobleck.

It wasn’t long before they asked me to read the story to them…and that’s when things got really fun!

I found as I read the book to them, they were literally trying to tell the story by using their Oobleck substance. It was really fun for them and interestingly adorable, to me too! Their Oobleck started to form in the sky like the in the book, then it started to fall. It got bigger and started covering everything around it…

and in the end it covered everything in site. I guess you will just have to read the book to see what happens in the end, but I can assure you that the kids cow fared out well after it was covered in Oobleck.

I definitely recommend this little activity, even if you don’t pair it with a book reading it is super fun. We have had the Oobleck in air tight plastic bags for over a month, and it is holding up great. The kids love to get it out and play and they always talk about the book. It was so fun to bring the story to life in a way that gets the kids excited about reading!
How fun!!! I love the hands-on experiment and FREE exploration time!