Today I am bringing you a super budget friendly way to completely transform your kitchen for about $12.00. Need an inexpensive, quick fix for a so-so kitchen? Well here it is. Textured, paintable wallpaper turns a drab back splash from boring to polished in just a few easy steps. No power tools, no expensive supplies, and no contractor bills. Plus this is an easy way to change things up without a permanent damage to the walls that would be expensive to remove and replace like tile back splashes. This stay at home mom did it all on her own after bedtime while her kids were fast asleep and you can do it too.

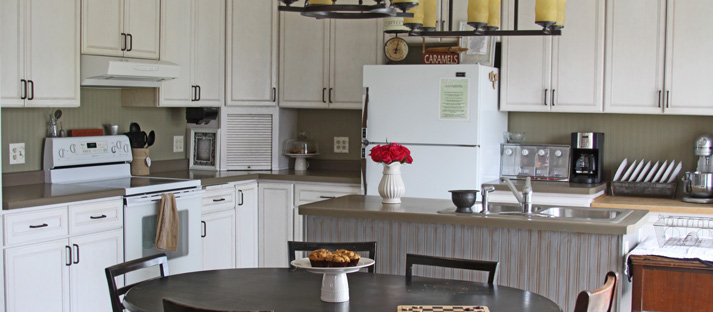
I hear angels singing when I look at this picture, and I simply cannot believe how inexpensively I was able to update our kitchen! Ok… the angels singing might be because the kitchen is actually clean in the photo, which is rare when you are home with the kids all day – but, on very rare occasions it looks this pretty.
So here is a project that I have had ready for months and I am so excited to finally have a chance to show it to you! When we first moved into our current home we pushed the envelope and bought our dream house knowing full well that there would be absolutely no money in the budget for remodeling projects. The kitchen was set up beautifully and had great storage and functional spaces, but it also had a serious lack of style and outdated decor. See….

Love it or hate it, this is what we had to work with. Our kitchen is open to our living room and is completely visible the second you walk into any door of our home. For that reason, it really bothered me just how much I despised the “country bumpkin” look of our kitchen (as I called it). I was happy with just painting the living room – but it really made me desperate to do a little makeover on the kitchen. Being home with the kids all day reminded me daily of how badly the outdated decor stuck out and how much it did not fit our style. I make and clean up three meals a day in that kitchen, and it is really the central meeting place – the epicenter of our home so I really needed a change to make it my own. Like I said earlier, the budget just did not allow for an extreme change, or even the style and decor we prefer, but I did want to make it work for now, until we save up enough to do it in the grand form we would like to.

So while my kitchen is not quite done, and isn’t my dream kitchen, it is now a comfortable and fitting place for our family to spend lots of quality time together. The paint-able wallpaper back splash was totally worth the $12.00 that I spent on it, and I was able to complete this project all by myself while the kids were sleeping. This was one of those projects that I knew I wanted to try after seeing tons of kitchen makeovers and remodels using breadboard for back splashes and kitchen islands. I love the look of it and thought it would fit our home just right. I brought this up to my very busy husband and he thought it was a great idea, but that it wouldn’t happen any time soon (we are talking years), so I decided I needed to take a new approach. Because it was something that I wanted to do on my own, without the use of power tools (because the babies would be sleeping during the makeover process) I needed a new plan of attack. While near the paint isles at Menards one day I spotted a roll of paint-able bead board wallpaper and snatched it up. I knew what I was going to do, but also knew that the hubby would think I was crazy, but without risk there is no rewards so I dove in feet first to cover our back splash in wallpaper!

This beadboard paintable wallpaper can be found at Menards or Lowes. I was able to completely cover the back splash and the kitchen island with less than one roll of paper. What a difference it has made in our kitchen, and it completely changes the feel of our entire Great room (kitchen/dining/living room).

So… I waited till the hubby was away for a couple of nights on business, and I got to work transforming our kitchen using the bead board wallpaper. I loved the way it turned out but I was so nervous when the hubby got home to hear what he thought. To my surprise he was totally impressed and really loved how it turned out too! Phew – way to stay out of the dog house lady! Maybe it was a little wrong of me to do it while he was gone, but I did it anyway.
In just a couple of nights our kitchen went from a room that I was totally unhappy with to a room that I love to pieces. Good thing, since I spend so much time in it. Here is a little about the process of adding our bead board wallpaper back splash.

Step 1: Was to remove the old ugly plaid wallpaper. This was something that I did almost instantly upon moving into our house. I used a steamer and a good old scraper as well as some wall paper removing spray to get rid of the sticky residue. For a while I tried to keep hanging things throughout the kitchen to try and make it look a little better after the wallpaper was removed, but nothing seemed to finish it off just right until I added the bead board wallpaper.
Step 2: I tapped off all of the counter tops with painters plastic and painters tape to protect the counters from the wallpapers backing (glue) and water. I removed all outlet covers and moved appliances so I could go around and behind them.
Step 3: I followed the directions that came with the wallpaper to apply it to the walls. I measured my spaces, cut the paper to fit and then wet, and applied it according to the manufactures instructions. All I really needed was a utility knife, pencil, measuring device, some sponges, and a bathtub full of water.
Step 4: After the wallpaper had dried and set for a day I got to work painting it with some leftover paint that I had on hand. I used a good quality brush, paint and a small sponge roller to add two coats of paint on top of the wallpaper, and VIOLA – transformation for cheap!
Just a little disclaimer for you in case you are thinking about doing this in your own home. Remember that this is a $12.00 solution to a project that could cost you hundreds or thousands of dollars. Do not expect to finish your back splash with bead board wallpaper and get the same durability and finish as a tile or more permanent wooden bead board solution. This paper has texture and thickness but it is made from paper so things that are left to lean up against it long term can leave indents in the wallpaper. The high quality latex wall paint does make it easy and safe to wipe down with a mild soap and water, but it can be still be scratched or dented. Which could be fixed with a quick paint touch up I suppose. Ours is holding up great so far and I have wiped it down many times, but if you need something more durable I would recommend using regular bead board instead of wallpaper. It is a great low cost alternative to altering your kitchen for less – so make sure it will work for you before you jump into a project!

I did the entire process on our kitchen island before I pursued doing the back splash. I wanted be sure it was going to adhere, and that I knew what I was up against before diving into cutting and patching pieces together to do the back splash. I decided to paint the island in an accent color instead of matching it to the back splash and I also added a decorative distressed finish as well. I will give the low down on the kitchen island later this week, but I love the contrast that it adds the the space and the texture is awesome.

Of course from the pictures you can tell that adding the wallpaper was not the only change in our kitchen from the before and after picture, but it was by far the most dramatic for the least amount of money. Here is a list of some of the other DIY projects that we did in our kitchen. Some I have blogged about already, and some are on the way. But each and every thing is something that is inexpensive and totally do able on a budget!
1. Remove old wallpaper
2. We removed a small partial wall between the living room and kitchen and also flipped our kitchen island a different direction. This cost us nothing but was messy and required help from the hubby to do it all.
3. Remove and replace old light fixtures. We re-purposed the old light fixtures in our master bedroom and found the new ones at Menards.
4. We painted our counter tops with Laminate counter top paint. This also made a very dramatic difference in the look and feel of the kitchen. We spent $20 on a can of specially made paint for counter tops (also from Menards) and painted them a color that we prefer over the hunter green that was already there. This was a pretty simple project and we did the first coat in one day. We have yet to add the second coat that the paint manufacturer suggest almost a year later, but we will get there eventually. I am very happy with the results and would recommend it as a really cheap way to cost effectively redo old counter tops without having to replace them. I am a terribly messy cook, and am not overly picky about things being perfect so I would recommend the counter top paint. It does gets scrapes and scuffs here and there, but if we had added the second layer, maybe that would be different. For us it works just fine, and it really made a difference in the look of our kitchen for only $20.00.
5. Repaint table and chair set
6. Wallpaper and paint back splash
7. Wallpaper and paint kitchen island with distressed finish
8. Remove and spray paint cabinet hardware
9. Upgrade stove with a free hand me down from our parents kitchen remodel
10. Add finishing touches: DIY $2.00 Cake stand, Cover utensil holder in burlap, make Menu Board, Update hand me down counter top coffee holder, Make aged galvanized chicken feeder plate holder, make a magnetic recipe holder
Although I think the kitchen is night and day better than when we moved in and coming along nicely there are still a few major projects I am planning for it. Next on the list is to:
1. paint the refrigerator with chalkboard paint
2. Install hardwood floors made from cut plywood.
Both of these will be difficult to convince my hubby of, but I think they will finish off the room just right with out spending a lot of money! Stop by again and see how things are coming a long, and hopefully it won’t take another year to get it done!
Thanks for the great ideas Kim!! I will be trying these.
Absolutely beautiful Kim! I love it! I especially live the picture with the flowers in the pitcher front and center. Great job!
This is beautiful! Thanks for sharing!
Question: what did you put where the wallpaper stopped and regular drywall started? It seems like some sort of trim would look best, but I think it might look funny since the trim would be so much thicker than the actual wallpaper. How did you handle it?