An ice cream themed birthday party is fun for kids of any age, and adults too! Putting together a party filled with all things ice cream is simple because items are readily available all year round. Your whole family will be screaming for ice cream. What kid wouldn’t love it? It is the perfect theme to celebrate a special birthday!

My little lady loves her ice cream, and all things sweet, for that matter. In honor of our precious little girl’s birthday we decided that we should have an “ice cream social” to celebrate with family. Considering that the kids birthday is in February, we thought it would be an extra special treat in the middle of winter to have an ice cream bar. Last weekend we had a joint family birthday party to celebrate my son turning 5 and my daughter turning three. Since my son had his own Mario themed party with his friends from school the night before, I decided to make the ice cream party extra special for my daughter, but stick with a theme that could work for my son as well.

I put together a simple invitation in Microsoft word using clip art and colorful fonts. I kept the colors as gender neutral as possible since it was inviting people to celebrate both kid’s special days. The invitation had a header that said : “I scream, you scream, we all scream for ice cream!” It had the party time and date as well. Since everyone that was coming already knew our address I just put “Kyle and Olivia’s Ice Cream Parlor” as the location.

I had a blast decorating for the party. I found a great idea on pinterest to use a cheap plastic table cloth to make ruffled streamers in any color that you want. It was so super quick and easy and I thought the ruffled streamers were so pretty and special. It is as easy as cutting the tablecloth in strips and stretching the sides with your thumbs to create ruffles. I hung a few from the light fixture over the ice cream bar, and added a few more behind the favor table.

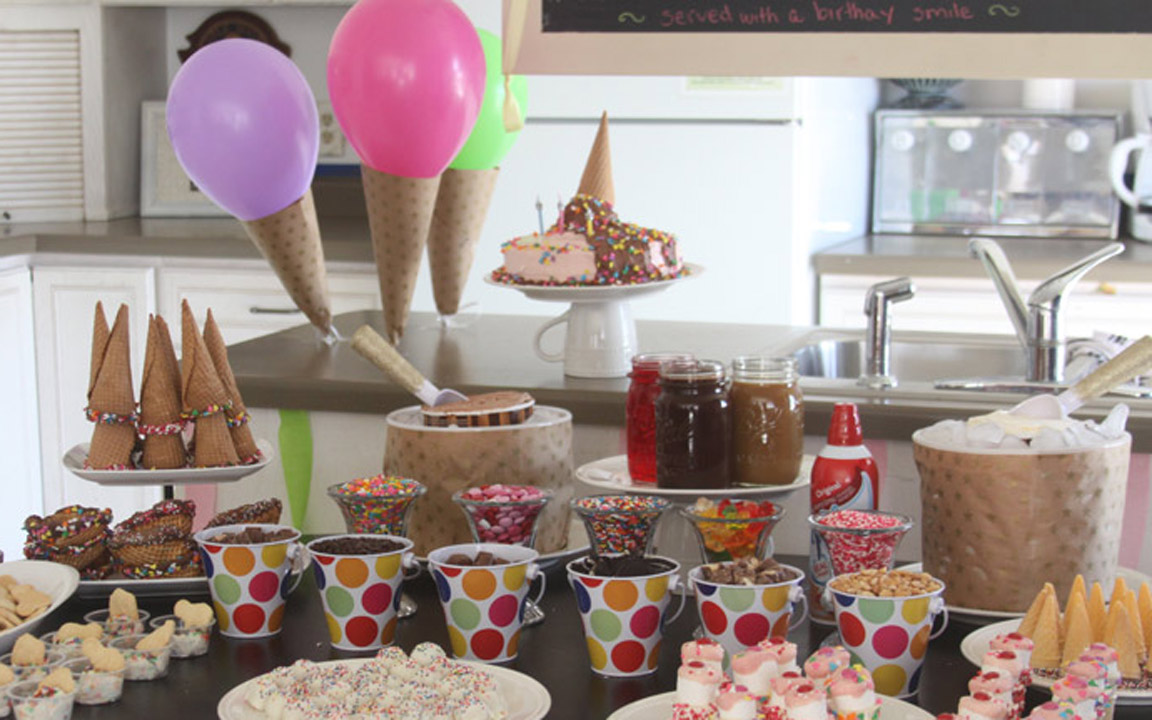
I used helium filled balloons and star covered wrapping paper from the dollar store to make giant ice cream cones for decoration. I was hoping that they would float and be an ice cream cone balloon bouquet, but I think my paper was too heavy. Never the less, they worked out perfectly as a table decoration. Simple and cute with a huge impact because of the brightly colored balloons.

I was even more pleased when the kids decided that they each wanted one! They carried them around the house throughout the party and they really had fun with them! The made a great decoration, and a fun party favor too!

My favorite decoration for the party was the chalkboard ice cream parlor menu that we hung from the light fixture in the kitchen. It was a last minute idea that made the whole party theme come together. The chalkboard is a piece that I have hanging in our living room as part of our gallery wall. At the last minute my hubby and I hung it from the kitchen light fixture using some ribbon and used it to write all of the ingredients, toppings, and flavors that were available to our guests! At the bottom we wrote: “Served with a birthday smile” for the kids.

I added a few pink and green streamers to the island in the kitchen as a subtle backdrop for the ice cream bar. The pink matched the ruffled steamers for my daughter, and the green matched the green ice cream pinata for my son. The colors were the perfect combination for a gender neutral party.

I found pink plastic utensils at the dollar store. Adding them to a little galvanized tub with some napkins was a great way to keep things organized as well as serve as a balloon weight for an ice cream balloon bouquet. I also used little votive holders filled with sprinkles as balloon weights for other bouquets. I ordered just a few ice cream themed plates, cups, and 1 mylar balloon from Birthday Express. Everything else “ice cream” I was able to find at target, the dollar store, or make myself.

I got a ton of great inspiration for the party off of pinterest, and combined a bunch of the ideas that I found together. I spotted this cute little cone party hat and couldn’t wait to make one for my daughter. I found a perfect little white headband with fabric roses on it at the dollar store. I used a regular sugar cone and sprayed a layer of gold glitter on it. After it had dried I hot glued it right onto the roses of the headband. I added a little piece of pink polka dot ribbon and a pom pom on top to make it look like a birthday hat. She absolutely loved wearing her little hat, and she could not have been any more adorable!

I was able to get a great shot of her in her hat that I used to make Thank you cards to send to everyone that came to the party. I always send a picture from the party as a thank you! I serves double duty by giving guest an updated picture of the kiddos, and a sweet thank you note on the back for being part of the special day.

The kid’s favorite activity at the party was a homemade ice cream pinata. I have found that making my own pinatas is not only very inexpensive, but it is a great project for the kids and I do together. I always have everything I need to make them already in the house. It is a bit of a process and takes a few days to complete, but the kids love seeing the pinata come together, and they especially love to help fill it with candy and stickers. I will do a more detailed tutorial on how we make our pinatas soon in case you want to try it for yourself. This cone pinata came together using a balloon, a wrapping paper roll, masking tape, diy paper mache paste, newspaper, green streamers, and glitter spray.

We had the party around dinner time and served light foods. I really wanted the ice cream bar to be the main attraction so I tried not to go overboard on food. I came up with these sweet little yogurt and blueberry filled ice cream cones, that the kids loved. I added a couple blueberries to the bottom of the cone first so the yogurt wouldn’t leak out. I then added vanilla yogurt and some more blueberries to a sugar cone for an easy to eat and super fun healthy treat. I used drinking glasses to serve them from. We served cold sandwiches as the main course because it is my sons favorite thing on earth to eat. My mom brought her most amazing potato salad and a huge veggie tray and my mother in law brought a big batch of taco dip. It was the perfect “summer like” meal to have before our dessert.

I kept the dinner and decor simple as to not distract from the dessert table. A few balloons, streamers, and a ice cream themed favors for the kids. The ice cream bar was definitely the star of the show, and had a huge “wow” factor once it was all placed out on the table.

I had so much fun putting together this ice cream bar! I knew it would not only delight the kids, but all of the adults too! The chalkboard sign had all of the available ingredients for everyone to see, and the table was filled with anything that one would love to add to their ice cream.

I served only two flavors of ice cream because there were so many other things to add to it. I came up with a great way to serve the two flavors of ice cream that worked fantastic and looked cute too. I first found two gallon ice cream pails that were clean and dry. I wrapped them with a cute star patterned wrapping paper that I found at the dollar store (which coordinated with the balloon ice cream cones). After the pails were decorated I filled Ziploc bags with water to put on the bottom underneath the carton of ice cream. I added the smaller tub of ice cream and then added more Ziploc bags of water around the outside of that to hold it in place. I added some heart shaped ice cubes over the top of the Ziploc bags to cover them up and add a little extra ice. I stuck it back in the freezer so the water would freeze and I had an awesome ice tub to serve the ice cream out of. I was able to just pull it out of the freezer when it was time to serve it, and just leave it out on the table for the guests to enjoy. It was nice to have all the prep work done before the party so I could enjoy myself and not worry about the ice cream melting.

I also found some simple white plastic ice cream scoops at Walmart for less than $1 that I spruced up with some glitter spray (the same spray I used for the pinata). I taped off the scoop end and simply sprayed the handles and let it dry. Instant sparkle for my little lady’s special day. I sent these through the dishwasher after the party, and to my surprise the glitter spray held up great.

The ice cream table was also filled with special treats that my daughter and I made together throughout the week before the party. These cake batter truffle were my absolute favorite tasty treat at the party and I can’t wait to share the recipe with you soon! They were oh, my….really…. really good!

The cake was a simple boxed chocolate cake layered and frosted with light and fluffy cool whip and pudding mix frosting. I skipped my usually fondant covered cake this year, because I thought that a simple chocolate cake might be a great combo mixed with ice cream and toppings. I wanted it to look like there was a chocolate ice cream cone melting on top of the cake inspired by this cute cake. I simply added a hostess cupcake and covered it in chocolate frosting, stuck the cone on top of it and then frosted down one side of the cake and around the bottom. Some colorful sprinkles added a special touch to the cake and finished it off nicely.

I have seen all sorts of cute ice cream cone cake pops and other types of cone treats. My daughter loves marshmallows, so we came up with these adorable little marshmallow treats to serve at the party. They are a combination of marshmallows, small cones, melted white chocolate chips, sprinkles, and M&Ms for the top. The were fun to make and the kids really enjoyed eating them too!

We dipped a variety of sizes and shapes of ice cream cones and bowls in melted milk chocolate and rolled them in a few different kinds of sprinkles. The kids really enjoyed being able to pick which type of sprinkles they wanted on their ice cream cones!

I bought three simple types of syrup for the ice cream and fancied them up using some ball jars that I already had. The Chocolate, strawberry, and caramel syrup looked beautiful served in clear jars sitting atop a white DIY cake stand.

There was a great variety of topping for our ice cream treats. I wanted there to be something for everyone! I used 5 glass ice cream Sunday glasses to serve 3 different kinds of sprinkles, gummy bears, and M&Ms. I also had some cute polka dot tin buckets that I had from a previous party that I filled with toppings. I have used these so many times because the pattern and color goes with everything. I think I found them at Hobby Lobby. In the little buckets I had mini chocolate chips, peanuts, mini peanut butter cups, Twix, Oreos, and Kit Kats cut into small pieces.

I also had a can of whipped topping, a bowl of maraschino cherries, and a batch of cake dip served with animal crackers to add to the ice cream bar. It was so fun to see what each person put together for their ice cream treat. I did my best to snap a picture of each guest enjoying their ice cream! It was certainly a very special treat to celebrate two very special little kids! I hope that everyone there felt like a kid in an ice cream parlor while they were at the party!

The kids each left with a little favor that included one ice cream cone shaped bubble dispenser, and one ice cream cone candy holder. I found the bubbles at target in their party section and the candy at the dollar store. I packaged the favors in a little clear party cup with a small amount of tulle in the bottom. I added a sheet of scratch and sniff ice cream stickers to the cup and wrapped them up in a bag with a raffia ribbon. The perfect parting gift for our ice cream stuffed friends!
Holy cow!! Looks like an awesome party, and very personalized. How sweet – really, really sweet. :~)
I really love all your ideas! I have been sitting here for about 90 min or so just reading your blog! I can’t stop! I love it!
Thank you for sharing all these cool ideas! I can’t wait to use them!
I am SO happy that you have found A Spotted Pony! Glad to hear you found some good inspiration and would love to hear what project you tackle first! Thanks for stopping by!